Fragment libraries evaluation with fragPELE
Introduction
FragPELE is able to grow fragments from custom-made libraries. All you have to do is provide it with a directory containing your fragments (in PDB or SDF format) and a docked core to let the software rank your fragments and return the best binding modes for each.
Inputs
protein-scaffold PDB file
directory with fragment files (SDF or PDB)
input.yaml configuration file
Default parameters
frag_eq_steps: 20
gr_steps: 6
frag_steps: 3
Recommendations
Computational time is estimated between 30min and 3h per fragment (depending on the number of rotatable bonds).
1. Complex Preparation
Protein-scaffold PDB file
The PDB file should be preprocessed with Maestro Protein Preparation Wizard. We usually recommend protonating the protein (obligatory), deleting water molecules more than 5Å away from ligands and ions as well as filling in missing loops and side chains.
The file must contain protein in complex with a fragment (scaffold), e.g. an X-ray structure or a docked pose. Additionally, ensure the ligand has:
unique chain ID
no atom names with spaces or single letters (occasionally Maestro adds hydrogens named
H1 2, these need to be corrected)any unique residue name, except for
UNKwell-defined aromatic bonds.
Directory with fragments
The fragment library should be preprocessed using Schrodinger LigPrep (default settings should be sufficient) and have unique molecule names.
2. Input Preparation
Prepare input.yaml file:
frag_core: "complex.pdb"  # Protein-scaffold complex
frag_library: "/home/username/aromatic_library"  # Folder containing fragment files
resname: "LIG"  # Ligand scaffold residue name
chain_core: "L"  # Ligand scaffold chain ID
frag_core_atom: "C6-H6"  # Connection point from which you want to grow the fragments
cpus: 48
Optional Parameters
frag_restart_libraries: To resume a fragment libraries simulation.
fragment_atom: Select a hydrogen of the fragment that we want to attach to the frag_core_atom, instead of performing a simulation from every hydrogen of the fragment.
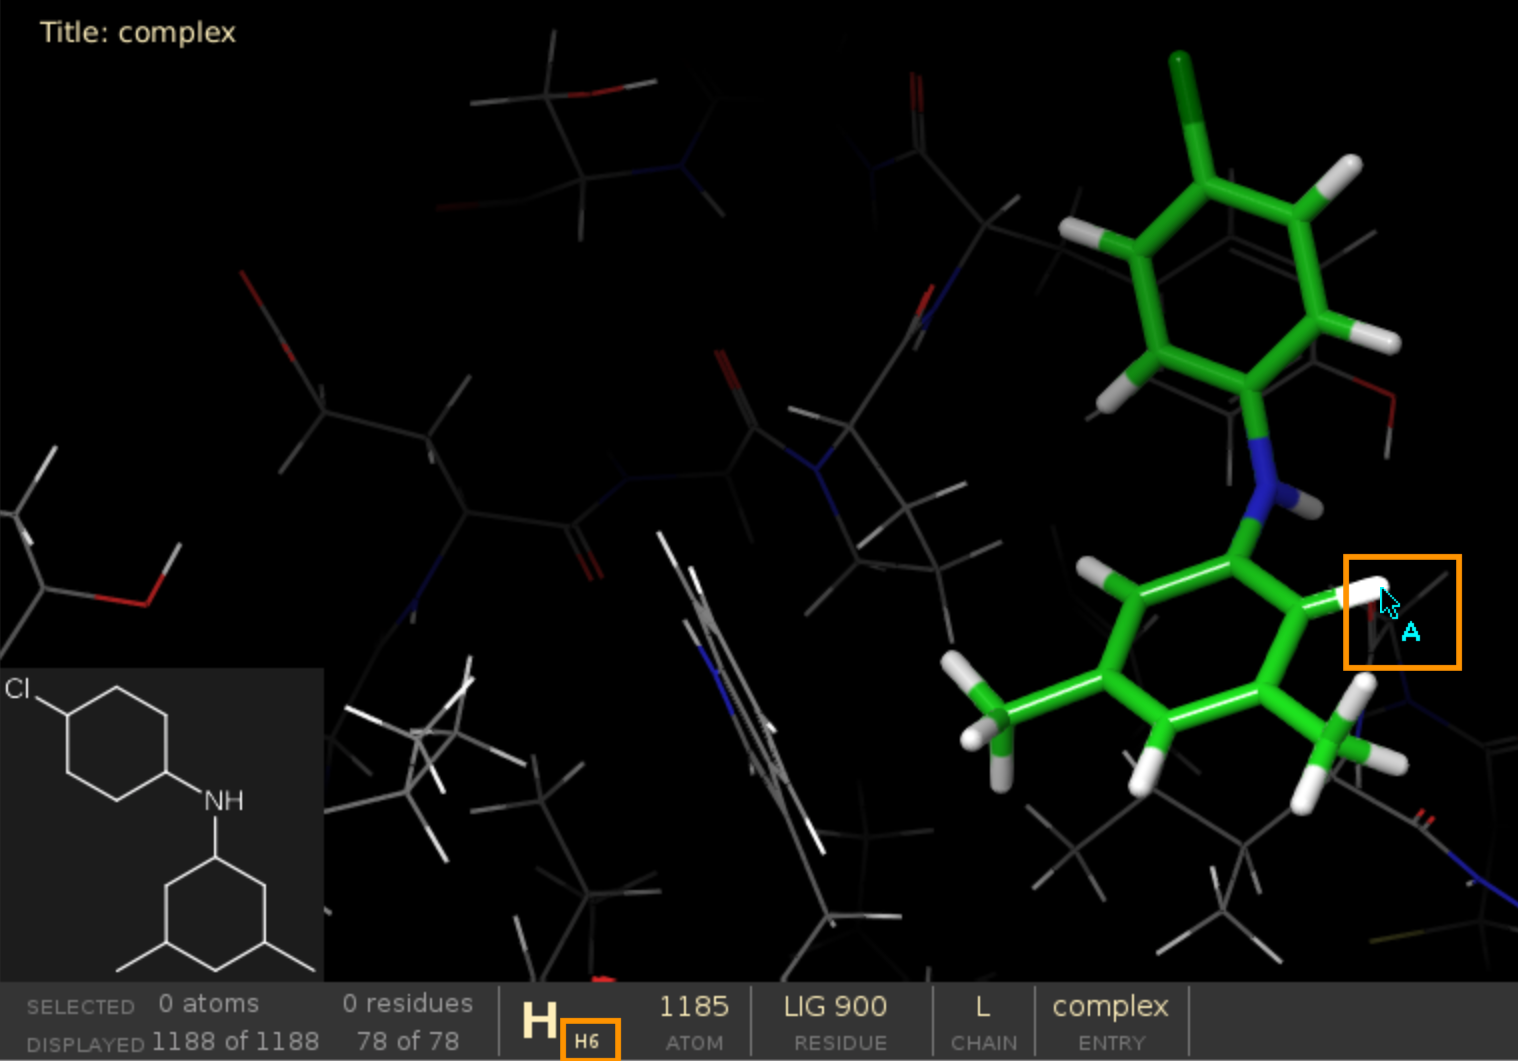
Defining frag_core_atom
Not sure how to define frag_core_atom?
Open your PDB file in Schrodinger Maestro and hover over the atoms to see their PDB names on the panel below.
The starting point for fragment growing should consist of a heavy atom and a hydrogen, e.g. “C6-H6” on the picture below.
3. Run simulation
To run the system launch the simulation with the following command:
python -m pele_platform.main input.yml
4. Output
The simulation will create a TSV file with scored fragments as well as a number of fragment folders, the names of which will consist of the scaffold and molecule names.
Scored fragments
The list of all grown fragments together with their associated scores (average binding energy of the top 25% of all poses) can be found in:
simulation_score.tsv
Top poses
Each fragment folder contains a top_results folder with PDB files corresponding to the best poses for that fragment:
fragment_folder/top_results/
5. Analysis
Once your simulation is finished, you can run an automated analysis to retrieve most promising fragments based on their proximity to a certain point, for example a side chain atom you would like your fragment to interact with.
All you have to do is adjust your input.yaml and launch it as before. Ensure you:
provide PELE with the path to your working folder, i.e. where you launched your simulation in the first place
set
only_analysis: trueset your desired coordinates in
analysis_to_point.
Example:
frag_core: "complex.pdb"  # Protein-scaffold complex
frag_library: "/home/username/aromatic_library"  # Folder containing fragment files
resname: "LIG"  # Ligand scaffold residue name
chain_core: "L"  # Ligand scaffold chain ID
frag_core_atom: "C6-H6"  # Connection point from which you want to grow the fragments
only_analysis: true
analysis_to_point: [24.835,  73.161,  17.026]
working_folder: "/home/username/LIG_Pele"
cpus: 48
The script will produce a point_analysis.csv file containing a number of columns:
File: Working folder
BestFileDistance: File with the best distance
Distance: Best distance to the point
BestFileBE: File with the best energy of the simulation
BE: Best energy
BestFileNormalization: File with the best distance and energy of the simulation (recommended)
BestNormalization: Best sqrt(distance^2 + energy^2)
DistanceBestNormalization: Best distance of the file above
BEBestNormalization: Best energy of the file above